LEGO
Here's what you will need for the final assigment. I will elucidate the different steps necessary to start toying with the lego robo.
All the actual experiments are to be carried out on the machine lego.cse.iitd.ernet.in in the VGLAB. However you can do offline coding from any machine on the intel cluster as lego.cse.iitd.ernet.in mounts your nfs homes.
VISION
First let us consider the vision part. For this to work successfully you have to ensure the following.
- You should be able to access the video input from the camera. To check this out type out the following command from your bash prompt.
If things work out fine you will see a window like the one demonstrated in the class. If you get the image straight away close the
application. If you get a blue screen then set the tv norm to PAL and the video source to television. If the application refuses to run
just check the permissions of /dev/video0 (ls -l /dev/video0). You should be the owner of it. If not (well we will try to provide you
with some scripts to enable you as the owner) talk to someone out there (probably me || avinash) to give you the permissions. Once you
have the image allright you are all set to start on with the application. Remeber to do this check with xawtv as it will save a lot of
trouble and it initializes some settings for the other codes to work fine. <>
- Now that you know that you can actually 'see' you should proceed to the calibration part. Copy the codes /home/phd/subhajit/trackingSock in your home. Or else you can set up a soft link to the actual executable bgsub to somewhere in your home. (Type " ln -sf /home/phd/subhajit/trackingSock/bgsub ." from somewhere in your home). You can run the program in two modes. One is just for grabbing an image which you can use for calibration and the other is for the actual vision part in your assignment. To grab an image for calibration just type in
Remember that you should run the executable from some dirctory (preferably where you have created the soft link) for which you have
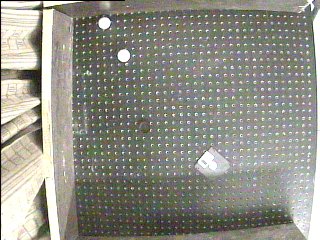
write permissions. The program executes for some time and dumps the image with the name calib.jpg. You will be using the image to do
your calibration. You will probably get an image like this
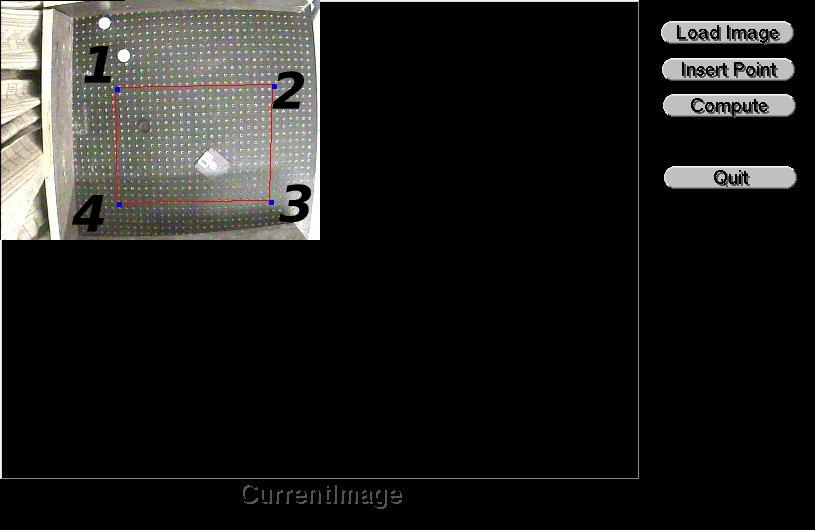
Now you are ready to calibrate the image. For this you will use the program /home/phd/subhajit/CropImage/bin/Homography. You can
also create a soft link to this executable to somewhere in your home. When you run this application you should first load the image i.e.
calib.jpg. Then click insert points. Then click the four points necessary for the calibration. The order on which they are clicked decides
the coordinate system in the world. The first point you click is the world origin. The second point is located at (500,0) in the world. The
third point is at (500,500) and the fourth is at (0,500). Here it is assumed that you have marked out a square whose sides are 500 units. If
you are uncomfortable with the 500 units stuff and would like to work with some actual measurements you can do this as a part of a post
operation or copy the directory CropImage from my home and just change the values of WWIDTH and WHEIGHT defined on top of the
file CropImage.cpp in the src directory to whatever you find more appealing and recompile. After finishing the insertion of points click on
insert points once again and then click on compute. It will request you for some file name type in any name say a.jpg and choose a
directory. Then say Quit on that small window. The program dumps some image files and dumps the homography matrix on the screen.
For example here we clicked in the order as indicated on the image.
The homography matrix is dumped as
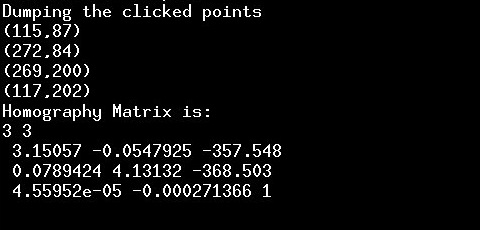
Besides the homography the application also dumps the clicked points. This homography matrix (H) is the transformation from the from
the image coordinate system to the world coordinate system on the table. Thus if you consider the first clicked point (which is the origin),
we can find its world coordinate as follow.
First express the point in homogeneous coordinates. For now you will need to know that you just put a '1' in the end to express the point
in homogeneous coordinates. Thus the first point becomes P=[115,87,1]. Regards this as a coloumn vector and left multiply it with the
H matrix. you get another 3x1 vector like this [0.00060250,0.00021600,0.98163461]T. Divide the first to elements of this vector by the
third to recover the world coordinates which turns out to be [0.00061377,0.00022004]T. This is the origin. Thus to get the world
coordinate of any point (expressed in pixel coordinates) just follow the above scheme.
- Now we consider the actual part which watches the
robot as it moves. For this you have to run the program bgsub in
another mode like this.
This program then becomes a server which will serve the queries for the robo position and the ball. It
does so through a local socket. It creates 'file' called mysock in the current directory. If there already
exists a file by that name remove it before you start this application. Now you can run a client
application like the one coded in myclient.c. it will talk to the server and get several information. You
can compile myclient.c simply by saying
gcc myclient.c -o mcl
Then you should run the executable mcl by giving it the name of the file mysock as the argument. This
will talk to the server and get the information in the following form.
It will be atring of characters where at first will be the number of objects detected. Then you will have
the area of the object (no. of pixels). Then the x and y coordinates of the centroid. Then the x and y
coordinates of the major axis. Then the x and y coordinates of the minor axis. You will have to use
functions like strtok, atof,atoi to extract the doubles and integers from this string. Check out the man
pages of these functions. Now have a look at the source of myclient.c.
Look at the function main. The code block
const char* const socket_name = argv[1]; |
     This is mandatory and should come as the initialization. It initializes the socket (whose name you
     give as the first argument). Then is the call to the read_text function. The read text function is
     is the one which reads from the socket and gets it in the char array dataToRead.After this call you
     have the server reply in the char array dataToRead which you can parse (suing strtok,atof,atoi etc)
     to extract the different informations.  You can run the function read_text in a loop and do all
     the processing you require. Remember to run the executable from the same directory where you have the
     socket mysock created ny running bgsub as described above. You should do some experiment to determine
     the typical area of the ball and the typical area of the robot. Also remember that the bgsub code
     might detect more than two objects (due to spurious noise etc.) We have left it on you to work it
     out what you should do when such a thing happens. One possibility is to simply ignore such reports
     and query again.
CONTROLLING THE ROBOT
We wrote a small api which can be used to controll the robot and send commands to it via the infra red
tower. For this you need write access to the usb bus on which the device is connected. We have done some
scripting to provide ownership to the console owner whenever the infrared device is connected to the
computer. We will provide some scripts to grab the ownership (if you are at the console). As of now you
should very carefully remove the tower from the usb port and connect it back again to claim ownership after
logging in. The details of the api is documented here. You can check out the example program here. You
should check out here to find the Makefile and figure out the compilation schemes.